Bernina Minimatic 707
Bernina is a Swiss family buisness that started producing sewing machines in the 1930s. The Minimatic 707 came out around 1969 and got the mini in it's name from being 3/4 of the size of a conventional model. It comes with 6 different stitches - straight (0) and zig-zag (1), as well as a blind stitch (2), running stitch (3), stretch seam (4) and a scallop pattern (5). It uses a conventional foot starter for power and controlling the speed. It came with an extension table, a case and the foot presser and originally also extra feet and tools for maintenance. The accessories you'll get with the machine on the second hand market will vary a lot.
The repair
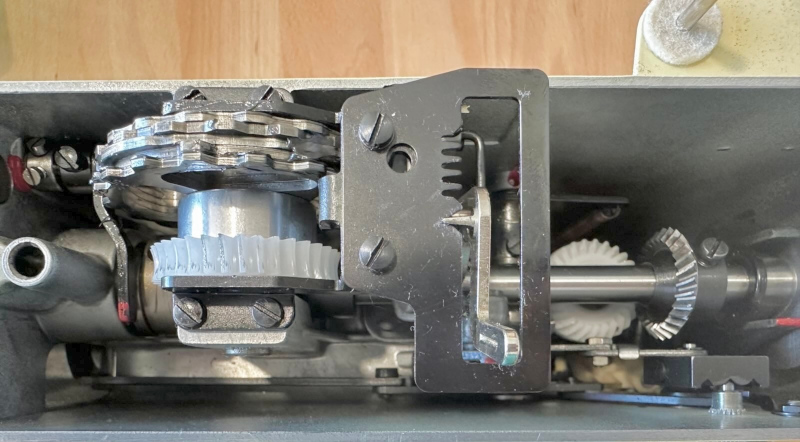
I found a Minimatic 707 locally for 50€, which is on the lower end for a functioning Bernina. I looked it up online, and found some forums with helpful adivce. It is recommended to check the plastic gear by taking off the top, since those are a common breaking point. I went to check it out, turned it on and the machine sounded very smooth. It did have the broken plastic gear, which I used to negotiate for 10€ off the asking price. The foot starter was broken as well, but still functioning to test the machine. The original case and extension table were also present and included, but no other accessories. First challenge was to transport this lovely little thing back home by train, since it weighs around 12kg.
Next I searched for and found a repair shop and hauled it there (still very heavy). They would call me if the repair cost was over 230€ to ask for confirmation, it would take around 5 weeks. They did indeed call to inform me of the main pieces that needed replacing: the two plastic gears as well as the foot starter. The total repair cost would be 380€. Luckily there was a federal programm to support small repairs. 50% of the cost, up to 400€, (which means max 200€ funding per repair) would be subsidised. With 190€ left for me to pay, I agreed and after ~6.5 weeks total, my Minimatic 707 was ready to be picked up. Without this special programm I probably would not have gotten a broken machine, since there are better offers for the 300€+ price point. But a fully functioning, freshly serviced Bernina for 230€ is not a bad deal and I'm happy I went with it.
Spare parts
Sadly, there were no extra feet included with my purchase, only the standard one already installed. I have been looking around and noticed that the cost for the original feet is quite substantial when bought new. It's not compatible with the new style of Bernina feet or with other standard presser feet, though you can apparently find converter sets for around 35€. I am looking for the original parts on the second hand market, hoping to find a set for around 50€. I believe that the original parts will work and feel better compared to a cheap aftermarket knock-offs, but I also ordered a foot for 8€ that allows for snap-on feet to test. Overall availability of parts is good, but can be expensive. The bobbin case and sewing needles are standard parts that can be easily found.
Comparison to modern sewing machines
I have worked with a Toyota SuperJeans J26 for a couple projects and a few other machines here and there. I also looked through current listings for sewing machines up to 350€. That is the basis for my comparisons - it does not apply in general or for all modern machines.
Pros of the Minimatic 707
- Needle position is independent of stitch selection
- The drop feed can be manually lowered to work with special fabrics like satin
- Sewing backwards does not require to hold down a switch
- Not all modern machines in that price range come with a light and light switch
- Threading a bobbin feels nice
- Overall, the quality of the stitches is better
- Thanks to the weight it does not easily move around
- It has a very slim free arm that can be made bigger with the extension table
- As long as the plastic gears and other essential parts are available, it will repairable
Cons of the Minimatic 707
- The Minimatic is quite heavy, which makes it hard to transport
- Buying original spare parts is expensive
- The needle plate does not have any measurement marks
- While modern machines also use plastic parts, compared to other machines from before 1975 those plastic gears are a con and a common breaking point
How to use
Important functions
Depending on previous expierence with sewing machines you might be more or less familiar with some of these functions. I mainly sewed with a modern Toyota SuperJeans J26 and I am still learning how to best use and combine the different settings on the Minimatic. The big plus compared to some of the entry level modern sewing machines on the market is the seperation of differenct settings. For example, being able to move the needle position independend of the stitch, which opens up a lot of possibilities.
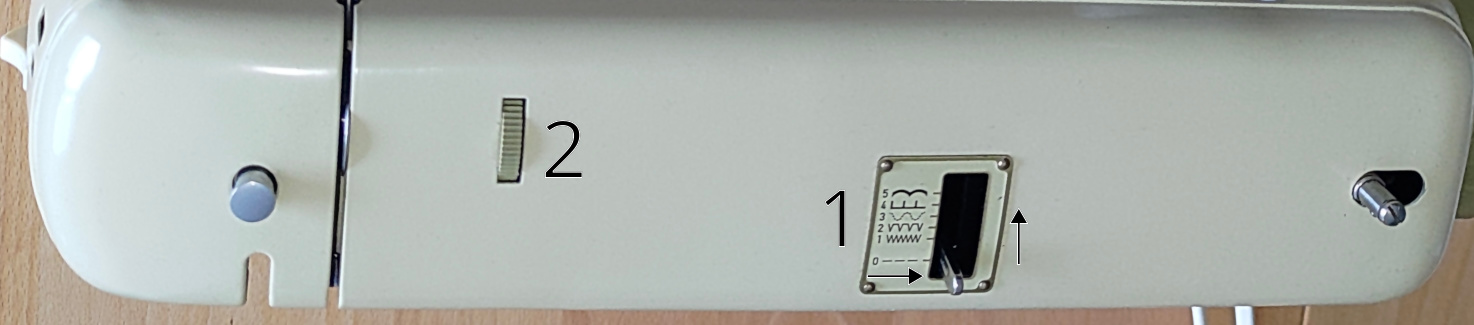
- Stitch pattern: to select a different stitch push to the right and lock it again
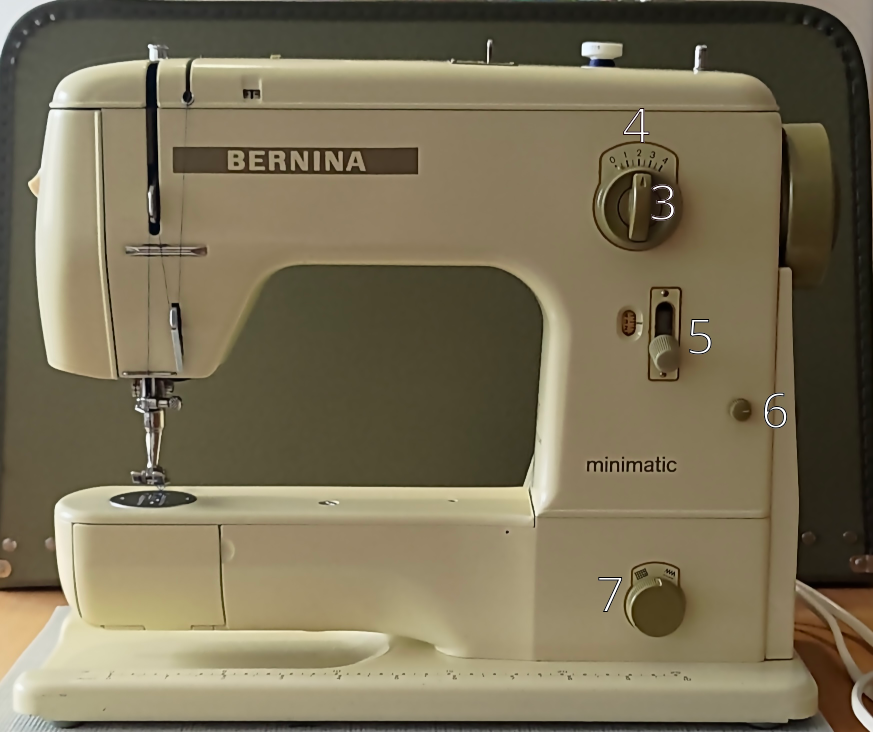
- Thread tension: make the thread tension lower or higher
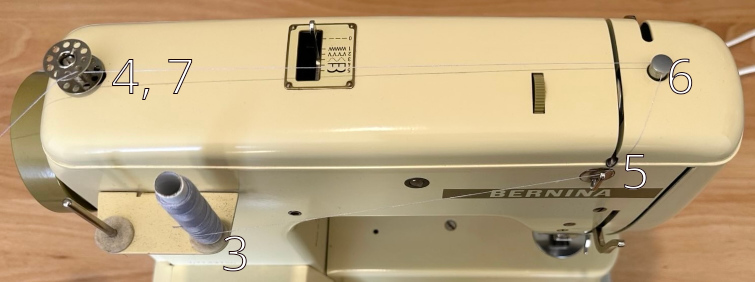
- Needle position: change the position of the needle with the inner knob
- Zig-Zag length: change the length of zig-zag stiches with the outer knob that points to 0 to 4
- Stitch length: set the stitch length. You can screw it tight to set a default. If you move this all the way up you can sew backwards.
- Satin & Buttonholes: the Satin Stitch Stop lever and the Satin stitch and buttonhole regulator - I have not used those yet, but if the lever on the side is up, you cannot reverse stitch
- Drop feed: in the middle of the needle plate is a part with teeth that helps move the fabric along. Make sure to choose an appropriate setting for different types of fabric. If lowered, your fabric might not move and you will get little knots.
Threading the bobbin
- Disengage the needle by turning the inner handwheel by turning it towards you
- Push the bobbin winder spindle on the top from the left to the right
- Put the spool on one of the two spool holder pins
- Take a bobbin and push it into the spindle
- Pull the thread through the eyelet on the back
- Wind the thread around the bobbin winder tension
- Pull the thread through one of the bobbin holes from below or wind it around the bobbin twice anti-clockwise
- Push the foot starter until you have enough thread for your project
- Take your bobbin and push the spindle to the left again
- Tighten the inner handwheel again by turning it away from you
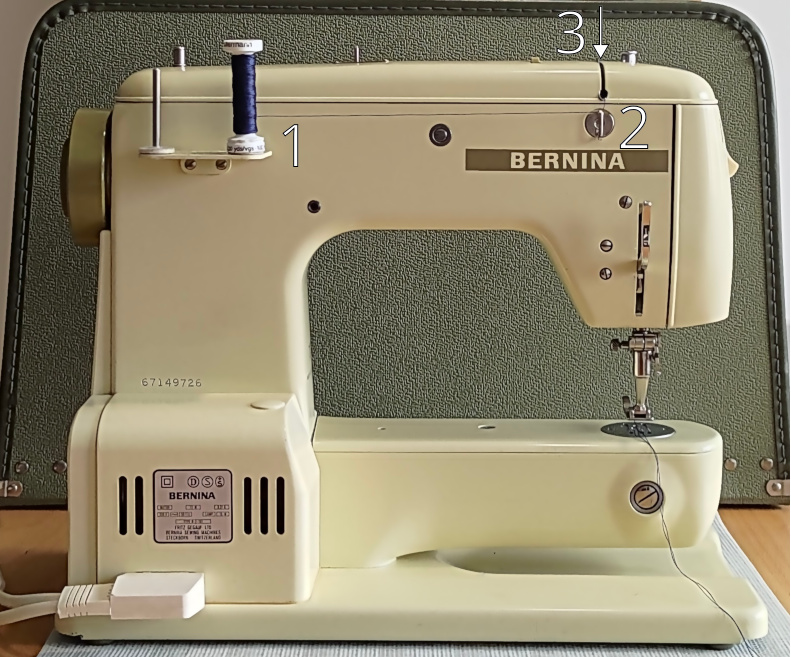
Threading the top
When I first tested my freshly serviced machine I was threading the top wrong, and the thread would end up very stuck in the bottom area around the bobbin case very quickly. After a frustrating ~20min, I looked it up on Youtube and realised my mistake. I included pictures to illustrate the steps for threading the machine correctly. You can also refer to page 10 of the official Bernina manual.
- Put your spool on one of the two spool holder pins in the back.
- Pull the thread through the eyelet on the back.
- Next put it between the tension disks on the top.
- Push the thread under the hook (the thread guide) on the front.
- Make sure to move the needle to the top using the hand wheel. You will see the take-up lever come up, put it through the lever.
- On top of the foot is the needle clamp. You can either thread from the top or just pull it in from the left side.
- Lastly, push the end of the thread through the eye of the needle from the front to the back. You want the thread to lay flat on the needle. If you have trouble with this, cut the thread at a slight angle and try again.

Links & Resources
- Some projects I did on this machine: Sewing Log #1
- Youtube video by Hesketh Emporium
- Blog post from verykerryberry
- Blog post from followthewhitebunny (this blog seems to be http only)
- Quiltingboard forum post with helpful commens
- Reviews on patternreview - you need a (cost-free) account to get full access
- Manual from bernina.com - some of the pictures inside the pdf don't show accurate details
- Collection of Bernina machines including the 707, showing pictures of the inside - use your search for quicker navigation